Home About Food

Holiday Baking


My mom and I have been working so much for our business! We've been baking treats, filling orders, and taking samples out to people who we think might be interested in ordering from us in the future. We're really excited about the direction we're going in. 


We've been working out issues that we've had with a couple of our desserts. Some of that involves changing our recipes slightly or baking in different types of pans. 


We're hoping that we'll be able to be a food vendor at Surf City Nights in downtown Huntington Beach. It's like a street fair and farmer's market that the city puts on every Tuesday night. I think that will get us some exposure. Maybe we'll even sell enough product to turn a profit.


So this is how we've been spending most of our weekends and any days that we have off from work!


Thanksgiving!


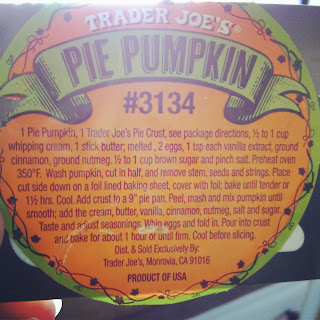
For Thanksgiving this year I made a pumpkin pie out of the pumpkins that Peter and I bought for Halloween. I thought this recipe was really good! Everyone loved the pie. My grandma even liked it and she doesn't like pumpkin pie.


The first thing I had to do was peel the writing off of the pumpkins because I wasn't sure how the ink would do in the oven. It probably isn't healthy to eat pumpkin cooked with sharpie drawings on it.


Then, I chopped, seeded, and baked the pumpkin halves until they were soft and mushy. The best way to do it is to wrap them in foil so they steam in the oven. 


This is my mixing bowl with the butter, whipping cream, brown sugar, pumpkin, vanilla, cinnamon, nutmeg, and salt. I used a full cup of brown sugar, a full cup of whipping cream, and 1/2 teaspoon each of nutmeg and cinnamon. I wanted to be able to really taste the spices. 


The pie crust I used was the same one that my mom and I use for our business


My pie pre-baking...


And post-baking!

It was pretty sweet so if you would like it not too sweet I would recommend adding half of the brown sugar and then tasting and adjusting after it is mixed. 


Banana Bread Muffins


Yesterday, I made banana bread muffins at work with the girls. We were watching Cupcake Wars when we decided we needed to make something sweet. Since it was the day before Halloween I tried to make it as healthy a cupcake/muffin as I could. So we used up some very ripe bananas we had in the freezer and whole wheat flour. 


These are the ingredients that we used, except the butter that didn't make it into the picture. It was a quick and easy recipe that my 6-year-old was able to help a lot with.

The first thing we did was mix the milk and lemon juice because we didn't have buttermilk. Then we creamed the butter and sugar.


Next, we added the thawed bananas. We mushed them up mixed them in.


Then, we added the eggs and my helper mixed them in. 


This is the dry ingredients we mixed in, just until they were combined. 


This is what it should look like after the sou milk is mixed in. 


I like to make banana bread into muffins because it makes them portable and I can pack them in lunches or take them to the park for a snack.


Our finished muffins! They are soft and delicious.

Banana Bread Muffins:

3/4 cup butter
1 1/2 cups sugar
3 overripe bananas
2 eggs
2 cups flour (I used whole wheat)
1 tsp baking powder
1 tsp salt
1/2 cup buttermilk (or 1/2 cup milk plus 2 tsp lemon juice)

The first step, if you don't have buttermilk, is to milk the milk and lemon juice to make sour milk. Then, cream the butter and sugar together. Add the bananas and mix. If you prefer, you can mash the bananas first, but I like to just add them in and and mash them that way. Next, add the eggs and stir in. Mix the dry ingredients separately and add to the wet mixture. Once the dry ingredients are just combined add the buttermilk or sour milk. Bake at 325 degrees F for about 20-25 minutes for muffins or 40-45 mins for loaves. This recipe made 20 muffins for me.


Decorating Pumpkins!


Today Peter and I bought and decorated pumpkins!


We went to Trader Joe's to get them because there wasn't a pumpkin patch that was close to my apartment this year :( But we did find sugar pie pumpkins there! So I'm going to make pumpkin pie for Thanksgiving.


We also saw these little guys which I think are so cute! So I picked 2 out to decorate with. 


Peter had to get my pumpkin for me because I couldn't reach it.


These are the ones we came home with. We picked 2 sugar pie pumpkins so that I could use them to make pumpkin pie after Halloween, as well as the mini pumpkins. We weren't planning on carving them because I didn't want the mess and Peter wanted to draw on them.


Our masterpieces! Mine is on the left and Peter's is on the right. Mine is more traditional, whereas Peter's is a cat. 


He also drew all the way around his haha. Another fluffy cat and a chubby squirrel. 


CPK with Friends


On Friday, Peter and I went to CPK with some friends for dinner. We hadn't seen them in over a month!


We drove up to Cerritos to meet Nick, Chelsea, and William.


Our original plan was to go to one of our favorite Thai places, Panvimarn, but the wait was 1 hour and 30 minutes! So we decided to wait only 20 minutes at CPK.


Chelsea and I started off with Caribbean Sunset Sangria and the boys had beers. It was in a really big glass! It had a couple a fresh pineapple slices, along with granny smith apple and blueberries, so I thought I might have a allergic reaction. I don't think I did; at least my throat didn't hurt or swell up. 


Peter and I shared Kung Pao Spaghetti, as usual...


and Asparagus and Spinach with Penne. This dish wasn't as good as usual. It was really plain. 


Shish Kabobs: My Family Recipe


Last night Peter and I cooked dinner together! This is one of my favorite meals and I knew he would love it too.


The first step is too cut up the meats you are using into chunks. They should be about 2-3 inch sized chunks. They need to be about the same size so that they cook evenly. You don't want burned and/or raw pieces.


The next step is to mix up the marinade.


These are the ingredients for the marinade. On the left is ginger and the right garlic.


Peter minced them up for me because he is a super helpful boyfriend and he does the parts that I like the least!


We divided the marinade up between the chicken and beef chunks and put them in air tight containers to marinade for about 5 hours. 


After they were done marinating I put them on skewers with onion and bell peppers that I cut into the same sized pieces. I like the flavor that the onion and bell peppers give, but I don't like to eat them. Peter does so I put extra on his. 


I had some zucchini in the fridge so I grilled them too. I think the chunks I cut were a little too big because they didn't cook all they way through. Next time I would cut them a little thinner.


We put the chicken on the grill first because it takes longer to cook than beef. I like it really well done. I know was over-cooked to some peoples' standards, but that's how I like it! I think the chicken cooked for about 30 minutes and I'm not sure how long the beef took. The zucchini only took a few minutes.


This is Peter's dinner. He really like the grilled veggies and refuses to eat brown rice so he had white rice.


And this is mine! I'm going to go have some leftovers now because writing this made me hungry!


Shish Kabob Marinade Recipe:

6.5 oz soy sauce
1 tsp ground ginger (I used fresh and about the same about of minced ginger as garlic)
1 tsp dry mustard powder
2 tsp sugar
4 Tbsp oil (I used grapeseed because it is a healthy, neutral oil)
4 garlic cloves (I used 6 because I love garlic and always used more than a recipe calls for)

Whisk all of the ingredients together and let beef, chicken, or whatever you want to use marinate for 4-6 hours. Any longer than about 8 will ruin your meat. It soaks in the salt from the soy sauce and will be inedible. 


Les Petites Sweets

Yesterday I was at my parents' house working on making some petite sweets because my mom and I got an order! It's so exciting to be getting jobs doing what we love to do. I stayed the night so that the cat wouldn't get lonely and so that I could work on these. 


The first thing I did was make the crust for Lemon Petites. 


It needs to be par-baked before adding the filling.


While it was baking I made the filling.


Ready for the final trip to the oven.


Next, I made Peanut Butter Chocolate Petites. This is the chocolate part. 


This is the peanut butter part. I love chocolate and peanut butter together!


Ready to bake! My brother says that they melt in your mouth.


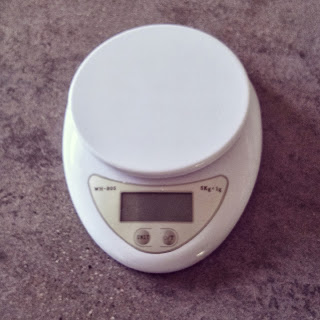
This is my kitchen scale. It is a necessity for anyone who like to bake or cook. It measures so much more accurately than spoons or cups and it really saves you time. 

And that's it! For final pictures and more information check out our website